Showing posts with label weight loss. Show all posts

Wednesday, April 13, 2016

All About Food Prep


One of the best ways to ensure you eat healthy throughout the day is to plan ahead. From grocery
shopping to cooking protein in advance there are many little tricks that might just save you from that
“emergency” fast food run.

It can seem overwhelming to think about prepping snacks and meals for an entire week, but once we
break it down for you, you’ll see that putting in a little extra work in the beginning will actually save you time (and unhealthy food choices) in the long run.

So, where do we start?

In the home, of course! Sit down and plan out what you’d like to eat in the next week, you can be very specific, or make general meal plans. Once you have a basic menu prepared make a shopping list. Let’s keep our shopping lists very specific to avoid too much temptation once in the grocery store. Head out to the store of your choice, it might be good to make specific lists for specific stores if you’re going to multiple locations.

Once you hit the store(s) stick to the list, don’t be tempted by a sale on your favorite ice cream (don’t
even go down the ice cream isle) or get distracted by the baked goods. Stick to the list, that’s why we
made it. Once you’re home with your grocery loot, store it appropriately until you are ready for your
actual food prep ritual.

The next step is to choose how and when you are going to do your food prep; my personal favorite is
Food Prep Sunday. Sundays are often more relaxed and we are looking forward and planning for the
week ahead, if Tuesday works better for you do it on Tuesday.

Set aside 2-3 hours and get ready to clean, chop, cook, and package your food for the week. I like to
make a large helping of at least one meal item so that I can take it to work for lunches (my current
favorite is spaghetti squash in meat/spaghetti sauce) It’s also helpful to have snack, or single serving
sized bags of an easy to eat fruit or vegetables, I keep about 20 sandwich bags of carrots in my fridge at all times.

You can also use this time to pre-cook some meat, either broil, or slow cook some boneless skinless
chicken breasts and set them aside to be used in meals later during the week. It takes about the same
amount of time to cook one chicken breast as it does to cook six.

Wash, cut and store all of your newly purchased fruits and vegetables. You can even throw a slow cooker meal in a zip lock bag and freeze it for later use. The possibilities are nearly endless.

The best part? Only doing dishes ONCE!

If you are not a bulk cooker, you can do a simplified version of this by just cleaning and cutting the
veggies and fruits to have them prepared for later, and then do the majority of your cooking each day as you eat.

However you choose to do it, I cannot stress enough how much this pays off.
Just having a plan, and healthy food in the house will more than double your chances of success! Seriously.

A quick review
1: Plan a menu for the week
2: Create a shopping list bases on your menu
3: Head to the store and stick to the list
4: Store food until ready for your food prep ritual
5: Clean, cut, cook, and package food for the coming week
6: Take it easy the rest of the week because your food is already prepared


Here are a few ideas of foods you can prepare this weekend

Friday, July 10, 2015

The Half Plate Challenge

Join us for the Half Plate Challenge by filling half of your plate with vegetables and fruits! Share your pictures on Instagram, Twitter, and Facebook by using #halfplate
I will be sharing recipes through out the competition.


Date: July 13th-August 9th  

Rules: Whole foods only

Serving Size: Portions will vary from person to person
One serving is equivalent to the size of one fist, with the exception of leafy greens; one serving of leafy greens is equal to the size of two fists.

No Supplements such as greens plus or greens to go or any other fruit or vegetable based supplement, powders, or additives. Bars, fruit leather, fruit snacks, and other such processed foods will also not count.

Vegetable and Fruit juices are not eligible. However you can drink vegetable and/or fruit smoothies.  Juices are defined as liquid based drinks extracted from fruits and vegetables and exclude the peel and or seeds. An example would be V8 juice, Bolthouse, or any other variation made at home with a juicer.

Smoothies on the other hand include the peel and/or seeds and are generally made in a blender, and can be counted as fruit and vegetable servings.
Chips, fries, and potatoes in any form will not count as a vegetable serving.


The USDA's Dietary Guidelines recommend adults eat anywhere from 5 to 13 servings of fruits and vegetables per day depending on age, gender, physical activity, and overall health.

Tuesday, December 30, 2014

Setting New Year's Resolutions that You Will Actually Keep


The New Year is upon us! Did you set any New Year’s resolutions? How about last year, did you set, and keep your New Year’s resolutions? We see it every year, the “resolutioners” in the gym, and at the health food stores excited about reaching their goals, “This is the year!” they say.  Then a month or two later they are gone.

Why is it so hard to reach our goals? Are we not motivated, or talented enough? Would we be able to reach our goals if we just worked a little harder, maybe if we just wanted it a little more?  Maybe we are not the problem, maybe it’s our goals.

We are going to talk about setting SMART goals, goals that we can actually reach.  Here are some basic steps. 

1:  “S” is for Specific.

Who? What? Where? When? Why?

We often set goals that are very vague. “I want to lose some weight”

Our goals need to be more specific, we should be able to answer the “W” questions, “Who, what, when, where, why” Instead of saying “I’d like to lose some weight” our goal can be  “I’m going to sign up for weight training classes at the local gym, and go three times a week to help build muscle and lose fat”   

This goal helps us reach the ultimate goal of “losing some weight” but is specific enough that we have an action plan.


2. “M” is for measurable

How will I measure progress? How many? How much?

Another problem with vague goals is that we have no bar set to know if we have met the goal. In our example above “lose some weight” there is no way to know if we have met or fell short of the goal, and therefore will never reach it. In the goal of going to weight training classes three time a week it is very easy to measure if we went three times in a week.

Setting shorter term deadlines can be very helpful in keeping goals. Going to the gym three times per week is much easier to track than going to the gym 156 times in the year, even though they balance out to the same amount of gym sessions. 

Remember, for a goal to be measured you will need numbers, days per week, pounds lost, dollars saved, etc.


3. “A” is for attainable

Can this really happen? Is it attainable with enough effort? What steps are involved?

Our goals should be realistic, setting a goal that is impossible to reach, or out of our control is setting us up for failure.  Goals such as winning the lottery, or growing six inches, are goals that are (for the most part) out of our control and unattainable.

When we set goals for ourselves we also need to be aware of our current status. If you’ve never exercised before it’s unlikely that you will be able to run an Iron man race by the end of the current month, it is however possible to train up to such a goal.

Set a goal that is realistic, and that you are willing to put in the effort to reach.

4. “R” is for relevant

How and why is this goal important to you? Does the goal reflect your values?

What is it that you really want in life, and does this goal help you get there?  If you want to be able to play with your grandkids, or walk up the stairs without being out a breath, then a fitness goal is in line with your ultimate goal.

 When we set goals that don’t line up with our values, or we don’t have any emotional investment in, there is very little chance that we will have the motivation to reach them.

5. “T” is for timely

 Can I set fixed deadlines? What are the deadlines?

We need to have a specific deadline for our goals. The original goal of going to the gym three times a week gives us the deadline of the end of the week. Having a short term deadline can help keep us from veering too far off course. For example if I miss one entire week, I now have the new week to re-set and get back on track, as opposed to missing a few months before I realize how far off track I am.

Setting a deadline is crucial for any goal; it helps keep us on track, and motivates us to push through when the going gets tough.


Specific:   Who? What? Where? When? Why?

Measurable:   How will I measure progress? How many? How much?

Attainable:   Can this really happen? Attainable with enough effort? What steps are involved?

Relevant:   How and why is this goal important to you? Does goal reflect your values?

Timely:   Can I set fixed deadlines? What are the deadlines?


Thursday, May 22, 2014

Summer Sizzle Boot Camp


If you are ready for a great summer workout join me June 10th-July 17th for the Summer Sizzle Boot Camp!
Along with 12 amazing workouts you will receive a 2 week comprehensive meal plan, a food journal, and body composition testing to track your amazing progress!
You can sign up using the Pay Pal link on this page, or you can email me at;
awoodfitness@gmail.com

Comment below any questions you might have!

Wednesday, March 12, 2014

March Madness!!

It's that time of year, time to set our March Madness goals!

A quick review of what that entails. You all need to set a goal, but not just any goal, here are the "rules"

*The goal can not be body composition based (ie no weight or inches lost/gained goals)
*You must be able to obtain this goal within the month of March
*It needs to be a goal that I can measure (if you'd like to do a triathlon that's great, but I am not able to put together a triathlon for you in a months time)

So... now you're asking what can I have as a goal. I'll give you a few examples. :)

-Do a handstand
-Row x meters in x time
-Run x distance
-Do x unassisted pull ups
-Do x push ups
-Bench press x lbs
-Throw a football x yards (in my case around 2...)


Our bodies are amazing, and they can do incredible things! Sometimes we just have to train them...


Please post your March Madness goals below. I will post follow up blogs on ways we can achieve our super fun, and challenging goals!


We did this last year and it was so fun! My goal for this year is something that I've been really struggling with for a few months. Hopefully March Madness will give me the extra push I need to get there. My goal is to be able to do a handstand, something as a soccer playing young girl I never learned. 
I look forward to hearing your goals, please let me know if you have any questions!


Monday, February 24, 2014

Paleo Snickerdoodle Cookies


I found this recipe here, and was BEYOND excited. I love a good cookie, and Snickerdoodles have always been one of my favorites. I had to make a couple of adjustments, since my kitchen is not...well, up to par.

Paleo Snickerdoodles

2 cups blanched almond flour
⅛ teaspoon celtic sea salt
⅛ teaspoon baking soda
1 teaspoon ground cinnamon
¼ cup vegan shortening (I used coconut oil)
2 tablespoons honey
½ cup coconut sugar for dipping
1 tablespoon ground cinnamon for dipping

In a food processor, (I used a hand mixer, since I don't have a food processor...) combine the almond flour, salt, baking soda, and cinnamon
Pulse in the shortening and honey
Scoop 1 tablespoon of dough, and roll into a ball
Briefly dip ball in a small bowl of water
Roll wet ball in coconut sugar and cinnamon to coat
Place ball on a parchment paper lined baking sheet
Flatten ball with palm of your hand
Bake at 350° for 7-9 minutes
Cool and serve

When you dip the dough balls in the water try not to let them get too wet or they will fall apart.

Wednesday, August 28, 2013

90 Day Fit Challenge

It's time for another 90 Day Fit Challenge! After the success of last year's competition we decided to go for round 2! 

This is a great opportunity for anybody who is looking to make healthy life changes, and will provide an opportunity to win some great prizes! 

Grand Prize:iPad
Version will depend on what has been released by end of competition. 

1st Runner Up:At Home Suspension Training System


2nd Place: Foam Roller 


You can participate in three different ways, 
*Training with me three times a week
*Training with me two times a week
*Independent Training (I will email you a workout schedule and routines) 

To register click on the Pay Pal button on this page and click on the training package of your choice. I will send a follow up email to welcome you to the competition and schedule your session time(s).

All training packages include workout plan, nutrition program (via email), access to a blogger fitness forum, and the opportunity to win! 

Click here to read the fine print, and competition rules. 

Let me know if you have any questions. 

Monday, August 5, 2013

My 5 favorite fat loss "tricks"

*Eat veggies and Lean protein at every meal.
     Yes, even breakfast. I've been eating carrots for breakfast for about 4 years now, and I sort of love them. If that just won't work for you have omega 3 eggs with bell peppers or spinach, make a green smoothie, or juice. Once this is a habit you will feel incomplete without your breakfast veggies.


*Have 4-6 "feedings" per day
       This one is pretty common among fitness gurus and novices alike, so you may have already heard about it. You want to eat 4-6 meals all similar in size spaced (at least somewhat) evenly throughout the day. Try not to think of your feedings of meals and snacks, think of them all as fuel.


*Cut the carbs (except post workout)
      This might make you want to cry for the first week, but it works. For building muscle you can be a bit more lax on this one, but for cutting fat, especially belly fat, few things work better. There is a magical window of about two hours after you workout that your body processes carbs more efficiently. This is your golden hour to have bread and rice and pasta. Be sure to still eat the healthiest carbs out there, whole wheat and whole grain products.

*Protein, protein, protein!
     Especially after you workout protein is your new best friend. I like to supplement with a post workout protein shake, but you can eat chicken, nuts, eggs, legumes. green veggies, etc for your post workout protein boost. This will help your body recover quicker from your workout and help the damaged muscles rebuild themselves. It's a win all around. Again, you want to choose the leanest protein sources you can find. Some of my favorites are, chicken breast, lean beef, kale, raw nuts, and my protein shake.

*Water
    Most of you are probably dehydrated most of the time. Drinking more water will make you feel better, help your body function at a higher level, help you feel more full so you eat less, and help your hair and skin look and feel better! Wins all around. I love water. Try to drink a few liters a day depending on physical activity, and current weight. 


Thursday, June 6, 2013

Detox Water

I know there are a bout 1000 detox water recipes floating around out there. I prefer not to drink Cayenne pepper, or laxatives, so this water is perfect for me.

Ingredients:
1-2 Whole apples, sliced (I use organic Gala, but any fresh crisp apple will do)
2-3 Cinnamon Sticks (can also use cinnamon powder)
1/2 Teaspoon Turmeric (You can use less if the flavor is too strong for you)
Apx: 1 Gal Filtered Water

Directions: Add all ingredients to a pitcher of water. Let sit (as ingredients "steep") in refrigerator for at least 30 min. Drink, and refill (water only) when it runs out. The ingredients should stay fresh for at least a week. Refresh when flavor seems stale or fruit looks "iffy"

I love this because of the anti-inflammatory properties of the cinnamon and turmeric. This is great if you are suffering from an injury, sore, or just plain bloated.
Drink this in place of your normal water, you should be having several liters a day. Enjoy!


Tuesday, April 2, 2013

How to build up to a Headstand

I have always wanted to do cool things, "tricks" if you will. I figure I'm strong I should be able to neat things, right? I've got the headstand down, and now I'm moving on to other things. Here is how I built up to be able to do the headstand. 
I found the best way to start off is with the weight distributed between your hands and the top of your head. I like this way because it allowed me to slowly raise my body up. Here is the progression.


 In the tripod position bring knees to rest on the back of your arms. This is a great starting position to help establish balance.


The next move is to straighten your torso. This part takes a while to get down if you are not used to balancing like this. I took it very slow, to make sure I had total control of my body. 

Now for the money maker, to straighten your legs. These pics are of me not quiet there yet. I'm pretty sure I fell over after these were taken. Don't get discouraged, you can do it!


And finally it happens! The picture on the right was my first time "nailing it!"If my sweatshirt was not covering my face you would be able to see me yelling at my husband to hurry and take a pic before I lost it. 
After getting it down for the first time it becomes much easier. 


The main muscle group used to perform a headstand are the core muscle groups, this includes your abs and back. You might be surprised that it also requires arm, chest, neck, and leg strength...yes, your entire body, and you have to balance. 

Here are some of my favorite ab exercises.  

This one is especially good because you have to balance and use core strength!

Also here are some great exercises to help you with your balance.

Single Leg Clock Squat

Russian Dead Lift

Also a bit of upper body strength

Renegade Row

Doing a headstand is truly a practiced skill. Work on your strength, and practice your headstands, I used commercial breaks while the husband and I were watching shows on Hulu. 
Keep working and you'll get it in no time! 


Friday, March 29, 2013

Got Milk? Drink it, or dump it?

I posted this highly controversial info-graphic to my personal Facebook page, and was mildly amused by the responses I got. Everything from people agreeing 110% with all of the information contained, to a dairy farmer's daughter disagreeing with everything mentioned. Everybody felt very strongly either for, or against, milk. 
I personally don't drink milk (though I do indulge in cheese occasionally)  mostly because I don't like the taste. Having done my share of research I have ultimately decided against drinking milk, my husband still drinks milk, and we try to buy from local farms. It's good to support our local farms. 
No matter what side of the dairy issue you come down on I think it's incredibly important to do some research. Be careful the information that you chose to subscribe to since almost all studies are sponsored by somebody, the Dairy Counsel, Soy Farmers of America, there is always somebody behind the study. Try to educate yourself, and since I'm sure you don't have time to read everything out there try to eat as naturally as possible, and when possible locally. 


Tuesday, March 19, 2013

How to Increase Your Speed on a Rowing Machine

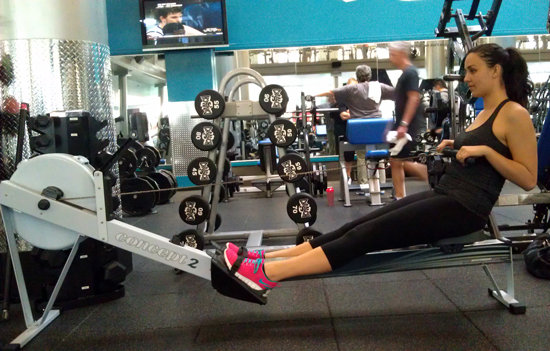
The rowing machine is, in my opinion, often overlooked as a great cardio machine, not to mention the added strength benefits. I think people generally find them a bit tricky to use, so I'm going to start with talking about proper rowing form, from there we will progress to increasing speed.

Beginning Position

  1. For your first row, set the resistance low while you figure out your form, then slowly ramp it up on subsequent rows.
  2. Secure your feet on the pads with the straps tight enough so your feet don't move around as you slide.
  3. Bring your knees up and slide to the top of the machine. Grab the handle using an overhand grip, but don't hold too tightly.
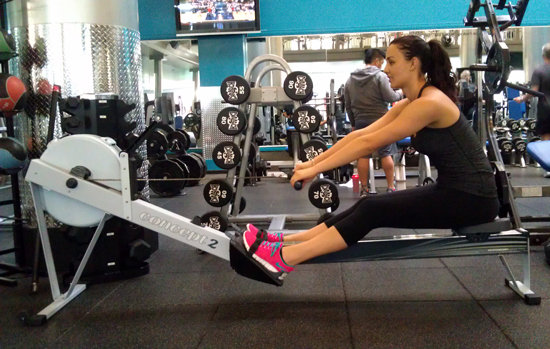
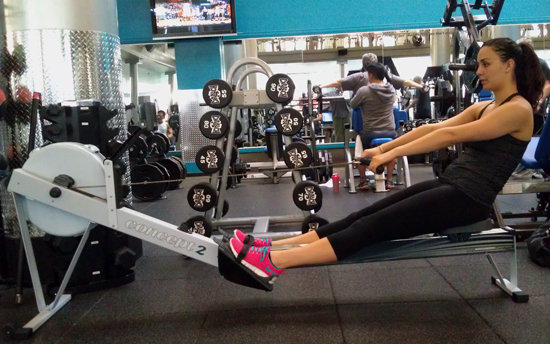
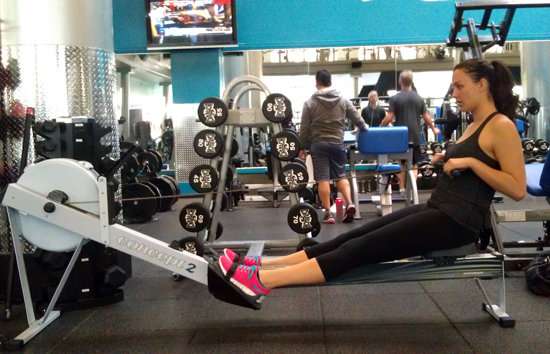
  4. Pull the handle with you as you slide to the end of the machine. Your legs should be straight, but knees should still have a slight bend in them so they aren't locked. Lean back slightly and pull your hands up to your chest, holding the handle so it is right below your breasts, with elbows pointing down against your sides. This is the position where you should begin your workout, and it's also your ending position once you complete a full stroke (see below).

The Catch

  1. Move your arms out first, followed by your upper body. Your back should always stay straight, not slumped, with shoulders back and abs engaged as you follow through. As your arms extend out, your upper body position will go from slightly angled back to slightly angled forward.

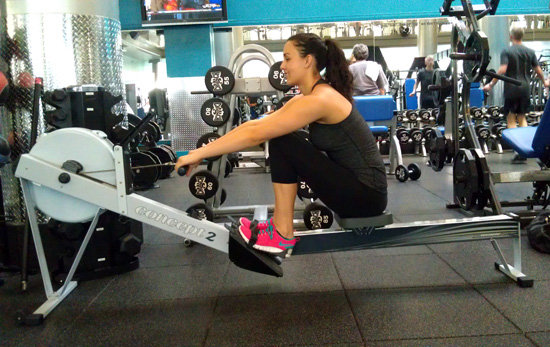
  1. As your arms extend and body leans forward, slide your body forward on the seat by bending your legs. Once you are at the top of the machine, your arms will be fully extended and legs will be bent (see below). This part of the stroke is called the catch.

The Drive

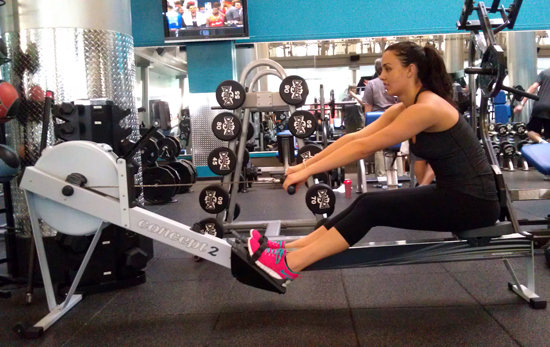
  1. To slide back to your finish position, push off with your feet first, so that your legs straighten but your arms are still extended and your body is still slightly leaning forward (see below). The drive is the part of the workout that mimics pulling the oars out of the water and propelling the boat forward, so it's this part that works your leg and core muscles the most.
  1. As you continue to push through with your legs, move your upper body so that you begin to lean back (see below).

  1. The last part of your body to return to finish position are your arms; as your upper body angles back, pull the handle and bend your arms so that the handle ends up back to touching the front of your chest, just like how you started (see below). Don't grip the handle too hard; the power should be through your legs, and using too much force while pulling the cable can cause hand blisters as well as back problems.
  2. Continue practicing your stroke slowly and at low resistance until you get the hang of it! It can be helpful to break the moves down into a sequence of what should move first: "arms-body-legs" as you pull up to the top of the machine and "legs-body-arms" as you push back.


The best way to master your rowing skills is to practice. Like they say, proper practice leads to perfection. Once you are comfortable with the basic stroke you can start working on increasing your speed. Here are a few tips to help you;

Increase your leg power:
You don't want to leave the majority of the work to your arms and upper body. Our legs are much stronger (generally) than our arms. Here are a few exercises to help increase your leg power.
Squat Thruster

Box Jumps

Tuck Jumps


Basically any plyometric leg exercise will work.

We also need to work on your upper body strength. Your core, arms, and back will need to be in top shape. Here are a few suggested exercises;

Hand Release Push Ups

Renegade Row

Pull Up

Plyometric Push Up

Now that you've got the strength, you need to work on your speed, and speed (or sprinting) endurance. The best way to do this is to actually practice sprinting, or excreting high levels of energy for extended periods of time. Here are a few of my  favorite high intensity drills.

Tabata: This is a 4 minute interval, 20 seconds high intensity, and 10 seconds rest, repeated 8 times. You can do this with basically any exercise, be it running, riding a bike, squatting, push ups... Just remember the higher the intensity the better. 

Circuit: There are several different ways that a circuit can be performed. My favorite is 30 seconds on and 3 second transition  alternating between a resistance exercise (squats, push ups, planks...) and a high intensity cardio exercise (buprees, mountain climbers, tuck jumps...) Here is a great one for you. 

Here is a more complete explanation of High Intensity Interval Training. 

Remember to practice rowing at least a couple of times a week, and work in these other helpful exercises on the other days. Some days will naturally be easier than others, but don't get discouraged! 


Saturday, March 9, 2013

How to build up to a Pull Up

My clients are always working on perfecting the exercises in my program, and the Pull Up is one that is a challenge for both the men and women. Here are some suggestions on how to build up to a perfect, "cheat" free pull up. 
The primary muscles used in performing a pull up are, as shown below, the latissimus dorsi, and trapezius muscles. 


To perform a pull up you will want to build up strength in these muscles. Along with performing modified versions of a pull up, you will want to do some exercises that will help to strengthen theses muscles.  
Here are just a few suggestions for you.  


Three Point Row

Man Maker

Body Weight Row


Try to use as heave weight as possible, to build up your upper body strength.

The best way to build up a specific skill to practice that skill, here are some modified versions of the Pull Up that will help you to build up to a cheat free pull up. In doing all of these exercises be sure to lower your body as slowly as possible to get the "negative" chin up or pull up in as well. The eccentric flexion of the muscles will help you to build up your strength much quicker! 

Cheater (Jumping) Chin Up

Chin Up

Cheater Pull Up


Until Finally


You can also use an elastic or pull up machine at your gym, or a chair at home. The key is to be sure that you are "cheating" as little as possible, and be weening yourself from the helpers. 
You should practice your skill at least once a week, and be sure to work in your other lat and trap strengthening exercises through out the week as well. 


Wednesday, March 6, 2013

March Madness

This month my clients and I are working on fitness goals. We have decided to focus, not on body composition, but on a skill. this is a great way to gain strength  speed, flexibility  balance, and probably lose a little weight as a side effect!
Here are the rules for March Madness:

The goal needs to be
*Measurable
*Obtainable (hopefully within the month time span)
*Realistic
*Not having to do with weight loss/body composition (in other words losing 2 lbs or 5% body fat will not work)
*Try to make this a fitness type goal. (memorizing your favorite poem, or leaning all of the choreography to Gangnam Style are not the kinds of things I'm looking for...even though those things are awesome)
*Fun! (I want you to look forward to working on your goal!)
*Something that I can measure for you (running a Triathalon is great, but I can't set one up/measure it for you)

Here are a few examples of what we are working on this month:

*Doing a Handstand
*Doing two unassisted pull ups
*Rowing 500 meters in 1:40
*Running an 8 min Mile

You can also work on sports specific goals like:

*Juggling a soccer ball 150 times
 *Slam dunking a basketball


By taking the focus off of weight loss and putting it on a skill we manage to gain new skills and lose some body fat/weight without really trying! 

Join us by posting a comment of what your March madness goal(s) will be! 
I will post some of the additions exercises that we will be doing (in addition to practicing the actual skill) in a future blog, and I will be happy to post some exercises that will help you reach your goals as well! 


Friday, March 1, 2013

What If Animals Ate Fast Food?


This is cracking me up today, but it got me thinking how us humans would do if we had to hunt, farm, or forage for our food in our current state. I'm afraid it might look a bit like this video.

Thursday, February 14, 2013

Chocolate Cheesecake


Looking for a healthy indulgence for Valentine's Day? Start prepping this delicious chocolate cheesecake tonight. <3  

*** CHOCOLATE CHEESECAKE ***
(AT Meal * 90 minute prep, cool overnight)

What You'll Need:
* 250G fat-free cottage cheese
* 1/2C low-fat chocolate milk
* 4 scoops chocolate protein powder
* 5 heaping teaspoons organic peanut butter

What You'll Do
Preheat oven to 350 degrees F. In a blender, combine cottage cheese and low-fat chocolate milk and blend until creamy and smooth. Remove from the blender and place into a mixing blow. Next, add protein powder and mix thoroughly. Finally, add in the organic peanut butter, one scoop at a time, blending until smooth.

Pour the mixture into a small 4-inch ramekin. Fill a deep oven pan half-full with hot water and place the ramekin inside of the oven pan so that the water comes approximately half way up the outside of the ramekin. Place the oven pan containing the ramekin into the oven and bake for 40-60 minutes, until slightly firm to the touch. 

When finished, pull from the oven and allow to cool for several hours. When cool to the touch, place in the fridge and cool over night. Serve cold or at room temperature. Makes 4 servings. 

Nutrition Information (per serving)
* Calories: 337kcal
* Protein: 41g
* Carbohydrate: 14g
* Fat: 13g
* Saturated Fat: 3.1g
* Monounsaturated Fat: 6.3g
* Polyunsaturated Fat: 3.5g

Chocolate Cheesecake
(AT Meal * 90 minute prep, cool overnight)

What You'll Need:
* 250G fat-free cottage cheese
* 1/2C low-fat chocolate milk
* 4 scoops chocolate protein powder
* 5 heaping teaspoons organic peanut butter

What You'll Do
Preheat oven to 350 degrees F. In a blender, combine cottage cheese and low-fat chocolate milk and blend until creamy and smooth. Remove from the blender and place into a mixing blow. Next, add protein powder and mix thoroughly. Finally, add in the organic peanut butter, one scoop at a time, blending until smooth.

Pour the mixture into a small 4-inch ramekin. Fill a deep oven pan half-full with hot water and place the ramekin inside of the oven pan so that the water comes approximately half way up the outside of the ramekin. Place the oven pan containing the ramekin into the oven and bake for 40-60 minutes, until slightly firm to the touch.

When finished, pull from the oven and allow to cool for several hours. When cool to the touch, place in the fridge and cool over night. Serve cold or at room temperature. Makes 4 servings.

Nutrition Information (per serving)
* Calories: 337kcal
* Protein: 41g
* Carbohydrate: 14g
* Fat: 13g
* Saturated Fat: 3.1g
* Monounsaturated Fat: 6.3g
* Polyunsaturated Fat: 3.5g

When it Began:Why I thought I would love Yoga

When I began my yoga journey I was very interested in the things my physical body could do. I still am, to be honest, however my physical se...